A while back, I helped out with the auditions at my school and was given a free LaGuardia t-shirt. Not only was it a size too big, the all around fit was just boxy and the shirt was therefore unwearable. I don't really wear t-shirts anyway, so I thought, "I better DIY this little sucka," and voila! I did just that. If you're a LaGuardia student and you have one of these nasty shirts, you should keep reading. Then we can be twinsies!
Remember how I said that I really like rolled up sleeves? I was inspired by that to make the sleeves in this design cuffed, but with a lil' twist. The finished product involves pleather, rolled sleeves and a healthy dose of snaz, if I may say so myself. However, this project is not for you if you can't sew. I mean, you could try, but it'll be pretty darn difficult. You should give yourself a solid block of time to do this; I can't tell you exactly how long it took me 'cause I was dilly dallying all day.
Things you'll need:
- a(n oversized) t-shirt
- scissors
- a measuring tape/ruler
- a sewing machine (or a needle and thread, but it will take you forever)
- pins
- OPTIONAL: thread that matches your shirt
- a bit of pleather (or any other fabric, it doesn't matter)
- several hours
- a shizton of good music (I chose Amy Winehouse. I've listened to the "Back to Black" album + a few assorted songs at leas 5 times today)
Step 1: Here's what my shirt looked like in the beginning. We about to tear dis baby up! (Please excuse my grammar.)

Step 2: Turn your shirt inside out and go to the armhole seam. Make sure that it's lined up with itself and then measure an inch from the seam out towards the sleeve and mark it with a pin. Do this along the entire seam. Easy stuff, right?

Step 3: Cut along the 1-inch line you made with pins in step 2.

Step 4: MAKE SURE THE SHIRT IS TURNED INSIDE. THIS IS CRUCIAL. If there's no side seam, just flatten the shirt out, and the places where they should be will sort of appear, and then pinch the hem where it's folded in half and the armpit of the shirt with the other hand. Smooth out the "seam" from there. Then measure your desired length in towards the center (only complete this step if the shirt is too big) to bring in the seam. I chose one inch and a half. Mark a pin, as shown below, along the whole seam line.

Step 5: Ignore the fact that the pins are facing the wrong way. I had to fix that later. The picture above is more accurate, but your shirt should look like this:


Step 7: Sew the seam along where you put the pins. You can't really see mine because I used white thread, but you can see where the fabric is puckered. Das da seam, guyz!
Step 8: Cut off the excess fabric. It has no business being there.

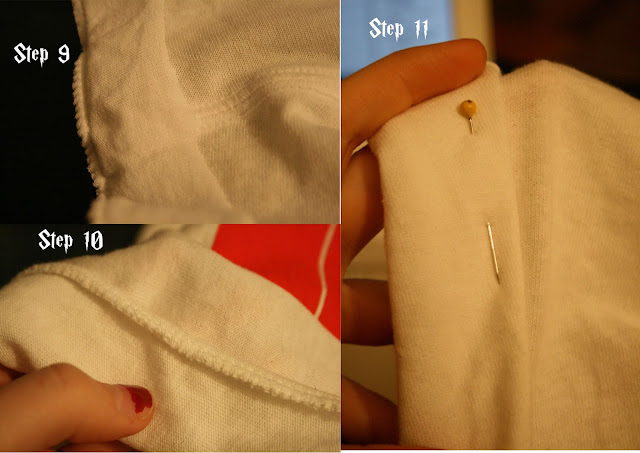
Step 9: Turn your shirt right side out. That's super important. Go back to the sleeve. You should have that little 1" flap. Fold it up, all around, so that the little pre-made seam is facing out.
Step 10: Roll the "sleeve," such as it is, up again the same way you did in step 9.
Step 11: I know. So much rolling. Do it one more time, but this time, pin it every few inches all around so that it stays put. Pins are sort of like hairspray in that way.
Step 12: Sew little 1/2" or 1" sections along the cuff, leaving spaces every few inches. Make sure you sew at the bottom, meaning where the side seam meets the underarm seam. Don't sew at the top, along the shoulder seam. You'll see why in a minute. Be patient, my grasshopper. (Do I say that a lot?)

Step 13: After you've done this it should look like this, minus the pins. Hey, this is my first DIY, I'm not too good at the whole putting-the-steps-in-the-right-order thing quite yet.

Step 14: Get out yo pleatha, girl/boy! Or whatever you chose to use; I realize that most people don't have fake leather just lying around their house as I do. Measure a piece of whatever it is that's the width of your tape measure (it's an annoying number, something like 5/8") and 3' long. Do that twice.
Step 15: Take one end of one of the strips and put it at the halfway mark of the cuff of one sleeve on the underside (there shouldn't be a lump on that side) with the top of the fabric facing you and sew it down.
Step 16: Then bring the strip around and sew it down next to the cuff, not on top of it. Gotta give them a little breathing space, am I right?

Step 17: We're almost done! This is not even a legitimate step, it's just what your shirt should look like by now. This actually might be the last one for you if you like the length your shirt is.
OPTIONAL STEPS:
Step 18: Decide how much shorter you want your shirt to be (subtract a half inch to an inch from that to save room for a hem) and then measure up from the existing hem that distance all the way around and do the usual pinning thing.
Step 19: Cut along that line and then hem it by turning the shirt inside out again and just folding up half an inch to an inch of the fabric and sewing it down all the way around (the shirt labeled "Step 19" is not hemmed, just btdubz). Also optional: cut off the bulky neckline that's probably there. I just thought it looked better.


Thank God that is done. That literally took me from 12 pm until 11 pm to do. With exercise, eating and dawdling breaks in between but you get the gist.
Have a wonderful evening, and DIY all day tomorrow! You won't regret it. Maybe a little if you actually liked the shirt the way it was and you end up just mutilating it but that's not likely to happen.
P.S. My newest article went up on Chictopia earlier today. It's about Vera Wang's bridal collection. Get it while it's hot!
P.P.S. I have another DIY in mind, and it has to do with Christian Siriano, shoes, and glitter. GET PUMPED.

Step 2: Turn your shirt inside out and go to the armhole seam. Make sure that it's lined up with itself and then measure an inch from the seam out towards the sleeve and mark it with a pin. Do this along the entire seam. Easy stuff, right?


Step 4: MAKE SURE THE SHIRT IS TURNED INSIDE. THIS IS CRUCIAL. If there's no side seam, just flatten the shirt out, and the places where they should be will sort of appear, and then pinch the hem where it's folded in half and the armpit of the shirt with the other hand. Smooth out the "seam" from there. Then measure your desired length in towards the center (only complete this step if the shirt is too big) to bring in the seam. I chose one inch and a half. Mark a pin, as shown below, along the whole seam line.

Step 5: Ignore the fact that the pins are facing the wrong way. I had to fix that later. The picture above is more accurate, but your shirt should look like this:

Step 6: DANCE BREAK! HAMMERTIME. I sometimes substitute that word for "stop." Like, if someone were telling me to do something and I was in the middle of doing something else, I'd say, "Hammertime, hammertime." I sort of just mutter it to myself. This step is entirely necessary; don't skip it.

Step 7: Sew the seam along where you put the pins. You can't really see mine because I used white thread, but you can see where the fabric is puckered. Das da seam, guyz!
Step 8: Cut off the excess fabric. It has no business being there.

Step 9: Turn your shirt right side out. That's super important. Go back to the sleeve. You should have that little 1" flap. Fold it up, all around, so that the little pre-made seam is facing out.
Step 10: Roll the "sleeve," such as it is, up again the same way you did in step 9.
Step 11: I know. So much rolling. Do it one more time, but this time, pin it every few inches all around so that it stays put. Pins are sort of like hairspray in that way.

Step 12: Sew little 1/2" or 1" sections along the cuff, leaving spaces every few inches. Make sure you sew at the bottom, meaning where the side seam meets the underarm seam. Don't sew at the top, along the shoulder seam. You'll see why in a minute. Be patient, my grasshopper. (Do I say that a lot?)

Step 13: After you've done this it should look like this, minus the pins. Hey, this is my first DIY, I'm not too good at the whole putting-the-steps-in-the-right-order thing quite yet.

Step 14: Get out yo pleatha, girl/boy! Or whatever you chose to use; I realize that most people don't have fake leather just lying around their house as I do. Measure a piece of whatever it is that's the width of your tape measure (it's an annoying number, something like 5/8") and 3' long. Do that twice.
Step 15: Take one end of one of the strips and put it at the halfway mark of the cuff of one sleeve on the underside (there shouldn't be a lump on that side) with the top of the fabric facing you and sew it down.
Step 16: Then bring the strip around and sew it down next to the cuff, not on top of it. Gotta give them a little breathing space, am I right?

Step 17: We're almost done! This is not even a legitimate step, it's just what your shirt should look like by now. This actually might be the last one for you if you like the length your shirt is.
OPTIONAL STEPS:
Step 18: Decide how much shorter you want your shirt to be (subtract a half inch to an inch from that to save room for a hem) and then measure up from the existing hem that distance all the way around and do the usual pinning thing.
Step 19: Cut along that line and then hem it by turning the shirt inside out again and just folding up half an inch to an inch of the fabric and sewing it down all the way around (the shirt labeled "Step 19" is not hemmed, just btdubz). Also optional: cut off the bulky neckline that's probably there. I just thought it looked better.

Step 20: Put on your shirt!! It should be done now, unless you want to add some embellishments. Go crazy. It'll make it that much better, I promise.
So, funny story, my remote is acting up. I think I accidentally left it on for 24 hours, which killed the battery. That's why I'm blurry in most of these photos; I had to use the self-timer. We all know how well that works.
The final result:


Shirt: DIY'd biznatches
Collar: ASOS
Jeans: Abercrombie & Fitch via Housing Works (I hope you didn't think that I actually went into an Abercrombie & Fitch store. That's just embarrassing.)
Snakeskin platforms: Vintage BCBG from my grandma. What a hip lady. So on top of trends.

Thank God that is done. That literally took me from 12 pm until 11 pm to do. With exercise, eating and dawdling breaks in between but you get the gist.
Have a wonderful evening, and DIY all day tomorrow! You won't regret it. Maybe a little if you actually liked the shirt the way it was and you end up just mutilating it but that's not likely to happen.
P.S. My newest article went up on Chictopia earlier today. It's about Vera Wang's bridal collection. Get it while it's hot!
P.P.S. I have another DIY in mind, and it has to do with Christian Siriano, shoes, and glitter. GET PUMPED.
No comments:
Post a Comment
Tell Me What's On Your Mind, Dear Readers!